
September 4th, 2012 | categorizilation: all categories,Japan,Post-2008
ŃéĘŃā×ŃāÄŃü«8µ«ĄÕåģĶŻģŃé«ŃéóŃĆüŃéóŃā½ŃāĢŃéŻŃā╝ŃāŹŃü»ŃĆüµēŗÕģźŃéīŃüīŃü╗Ńü╝Õ┐ģĶ”üŃü©ŃüŚŃü¬ŃüäŃāÅŃā¢Ńü«õĖĆŃüżŃü¦ŃüÖŃĆéŃāÅŃā¢Ńü«õĖĪÕü┤Ńü«ŃéĘŃā╝Ńā½ŃüīķØ×ÕĖĖŃü½õĖłÕż½Ńü¦ŃĆüŃéĘŃā╝Ńā½ŃüīŃüĪŃéāŃéōŃü©ńĘĀŃéüŃü”ŃüäŃéŗķÖÉŃéŖŃü»ŃĆüµ░┤ŃéäĶ¬ćŃéŖŃü¬Ńü®ŃüīŃāÅŃā¢Ńü«ÕåģÕü┤Ńü½ÕģźŃéŗŃüōŃü©Ńü»ĶĆāŃüłŃéēŃéīŃüŠŃüøŃéōŃĆéŃüŚŃüŗŃüŚŃĆüµĢ░Ńāȵ£łÕēŹŃü½ŃĆüĶć¬ÕłåŃü«ŃéóŃā½ŃāĢŃéŻŃā╝ŃāŹŃāÅŃā¢Ńü«ŃāŁŃā╝Ńé┐Ńā╝Õü┤Ńü«ŃāÖŃéóŃā¬Ńā│Ńé░Ńé│Ńā╝Ńā│ŃüīŃéåŃéŗŃüäŃüōŃü©Ńü½µ░ŚŃüźŃüŹŃĆüŃüÖŃüÉŃü½ńĘĀŃéüŃü¤ŃüīŃĆüµ░ŚŃüźŃüÅŃüŠŃü¦µĢ░µŚźŃü¤ŃüĪŃüŠŃüŚŃü¤Ńü«Ńü¦ŃĆüŃüØŃü«ķ¢ōŃü½µ░┤ŃüīŃāÅŃā¢Ńü½µĄĖÕģźŃüŚŃü¤ŃéłŃüåŃü¦ŃüÖŃĆéµ░┤ŃüīÕģźŃüŻŃü¤ŃüōŃü©ŃüīÕłåŃüŗŃüŻŃü¤Ńü«Ńü»ŃĆüŃāÅŃā¢Ńü»ķĆÜÕĖĖŃéłŃéŖµæ®µō”ŃüīÕżÜŃüŗŃüŻŃü¤ŃüŗŃéēŃü¦ŃüÖŃĆéŃüżŃüŠŃéŖŃĆüķĆÜÕĖĖŃĆüĶć¬Ķ╗óĶ╗ŖŃéÆõĖŖŃüÆŃü”ŃĆüŃāÜŃāĆŃā½ŃéÆķĆåµ¢╣ÕÉæŃü½Õø×ŃüÖŃü©ŃüŹŃü½ÕŠīŃéŹŃü«ŃāøŃéżŃā╝Ńā½Ńü»ĶŗźÕ╣▓ÕŠīŃéŹŃü½Õø×ŃéŗŃüīŃĆüķĆÜÕĖĖŃéłŃéŖŃééŃāøŃéżŃā╝Ńā½ŃüīÕø×ŃéŗŃéłŃüåŃü½Ńü¬ŃüŻŃü”ŃüäŃü¤ŃüŚŃĆüŃāøŃéżŃā╝Ńā½ŃéÆŃü©ŃéüŃü”ŃāÜŃāĆŃā½ŃéÆÕø×ŃüÖŃü©ŃĆüķ¢ōµ¼ĀńÜäŃü½µæ®µō”ŃüīÕżÜŃüÅŃü¬ŃüŻŃü¤ŃéŖŃĆüÕ░æŃü¬ŃüŗŃüŻŃü¤ŃéŖŃüŚŃü”ŃüäŃüŠŃüŚŃü¤ŃĆéŃüōŃü«ŃüōŃü©ŃüŗŃéēŃĆüŃü®ŃüåŃééÕåģÕü┤Ńü½ńĢ░ÕĖĖŃüīŃüéŃéŗŃü©Õłżµ¢ŁŃüŚŃĆüÕłåĶ¦ŻŃüÖŃéŗŃüōŃü©Ńü½ŃüŚŃüŠŃüŚŃü¤ŃĆé
õ╗ŖÕø×Ńü«õĮ£µźŁŃü«ńø«ńÜäŃü»ŃĆüŌæĀµæ®µō”Ńü«ÕĤÕøĀŃü«µŖŖµÅĪŃĆüŌæĪÕåģÕü┤Ńü«Ńé░Ńā¬Ńā╝Ńé╣Ńü«ÕåŹńö¤’╝łŃé¬ŃéżŃā½Ńā╗ŃāÉŃé╣’╝ēŃĆéŌæĪŃü½ķ¢óŃüŚŃü”Ńü»ŃĆüŃéĘŃā×ŃāÄń┤öµŁŻŃü«Maintenance OilŃü»ÕŁśÕ£©ŃüŚŃüŠŃüÖŃüī’╝łhttp://www.hubstripping.com/shimano-inter8/shimano-grease-oil-en.pdf’╝ēŃĆüŃéĘŃā×ŃāÄń┤öµŁŻŃü«ŃééŃü«ŃéÆÕĖéĶ▓®Ńü«ATF’╝łŃé¬Ńā╝ŃāłŃā╗ŃāłŃā®Ńā│Ńé║Ńā¤ŃāāŃéĘŃā¦Ńā│Ńā╗ŃāĢŃā½ŃéżŃāāŃāē’╝ēŃü©Ńü╗Ńü╝ÕÉīµ¦śŃü«ŃééŃü«Ńü©ŃüäŃüåŃüōŃü©Ńü¦ŃĆüń¦üŃü»ATFŃéÆõĮ┐ŃüåŃüōŃü©Ńü½ŃüŚŃüŠŃüŚŃü¤’╝łµēŗŃü½ÕģźŃéŖŃéäŃüÖŃüäŃüŚŃĆüÕ«ēõŠĪ’╝ēŃĆé
ÕłåĶ¦ŻŃü«µēŗķĀå’╝ÅŃéäŃéŖµ¢╣ŃéÆĶ¬¼µśÄŃüÖŃéŗŃāŹŃāāŃāłĶ│ćµ¢ÖŃü»ÕżÜŃüäŃü¦ŃüÖŃĆéń¦üŃüīµÄóŃüŚŃü¤Ńü«Ńü»Õģ©Ńü”Ķŗ▒Ķ¬×Ńü¦ŃüÖŃüīŃĆüńē╣Ńü½ÕÅéĶĆāŃü½Ńü¬ŃüŻŃü¤Ńü«Ńü»õ╗źõĖŗŃü«Ńé½ŃāŖŃāĆõ║║Ńü«ÕŗĢńö╗Ńü¦ŃüÖŃĆé
õ╗¢Ńü½ŃééŃĆüõ╗źõĖŗŃü«ŃāÜŃā╝ŃéĖŃü½ÕÅéĶĆāŃüŚŃüŠŃüŚŃü¤’╝Ü
Õ┐ģĶ”üŃü¬ŃāäŃā╝Ńā½Ńü»õ╗źõĖŗŃü«ŃééŃü«Ńü¦ŃüÖŃĆé

ÕĘ”ŃüŗŃéē’╝ÜĶ¢äŃüäŃā¼Ńā│ŃāüŃĆü15mmŃé│Ńā╝Ńā│Ńā¼Ńā│ŃāüŃĆüĶ¢äŃüÅŃü”Õ░ÅŃüĢŃüäŃāēŃā®ŃéżŃāÉŃā╝ŃĆüŃāöŃā│ńäĪŃüŚŃü«ŃāĢŃā¬Ńā╝ŃāøŃéżŃā╝Ńā½’╝ÅŃé╗Ńā│Ńé┐Ńā╝ŃāŁŃāāŃé»Ńü«Ńé╣ŃāŚŃāŁŃé▒ŃāāŃāł’╝łĶć¬ÕłåŃü»ŃéĘŃā×ŃāÄń┤öµŁŻTL-FW30ŃéÆõĮ┐ŃüäŃüŠŃüŚŃü¤’╝ē
ŃüōŃéīŃüĀŃüæŃü¦õ╗źõĖŗŃü«µēŗÕģźŃéīÕģ©Ńü”Ńü¦ŃüŹŃüŠŃüÖŃĆé
ŃüĢŃü”ŃĆüŃüŠŃüÜŃü»ŃāćŃéŻŃé╣Ńé»Ńā¢Ńā¼Ńā╝ŃéŁŃü«ŃāŁŃā╝Ńé┐Ńā╝ŃéÆÕÅ¢ŃéŖÕż¢ŃüŚŃüŠŃüÖŃĆéŃāöŃā│ńäĪŃüŚŃü«ŃāĢŃā¬Ńā╝ŃāøŃéżŃā╝Ńā½ŃéĮŃé▒ŃāāŃāłŃü¦Ńü¬ŃüäŃü©Ńü¦ŃüŹŃüŠŃüøŃéō’╝łĶ╗ĖŃü½ń®┤Ńüīķ¢ŗŃüäŃü”ŃüäŃü¬ŃüäŃü¤Ńéü’╝ēŃĆé
ŃāŁŃā╝Ńé┐Ńā╝ŃéÆÕÅ¢ŃéŖķÖżŃüäŃü¤ŃéēŃĆüµ¼ĪŃü»ŃāÖŃéóŃā¬Ńā│Ńé░Ńé│Ńā╝Ńā│ŃéÆÕÅ¢ŃéŖŃüŠŃüÖŃĆé15mmŃé│Ńā╝Ńā│Ńā¼Ńā│ŃāüŃü©Ķ¢äÕ×ŗŃā¼Ńā│ŃāüŃü¦Ńü¦ŃüŹŃüŠŃüÖŃĆé
ÕÅ¢ŃéŖÕż¢ŃüŚŃü¤ŃéēŃĆüµ¼ĪŃü»ÕÅŹÕ»ŠÕü┤Ńü½ń¦╗ŃéŖŃüŠŃüÖŃĆéŃāøŃéżŃā╝Ńā½ŃéÆŃü▓ŃüŻŃüÅŃéŖĶ┐öŃüŚŃĆüŃāÅŃā¢Ńü«õ╗śÕ▒×ŃéóŃé»Ńé╗ŃéĄŃā¬Ńā╝ŃéÆÕÅ¢ŃéŖÕż¢ŃüŚŃĆüŃé│Ńé░Ńü¬Ńü®ŃéÆÕÅ¢ŃéŖÕż¢ŃüŚŃüŠŃüÖŃĆéŃé│Ńé░Ńü«ÕÅ¢ŃéŖÕż¢ŃüŚŃü»ŃüŠŃüÜŃé╣ŃāŖŃāāŃāŚŃā¬Ńā│Ńé░’╝łµŁóŃéüĶ╝¬’╝¤’╝ēŃéÆÕÅ¢ŃéēŃü¬ŃüÅŃü”Ńü»Ńü¬ŃéēŃü¬ŃüäŃü¦ŃüÖŃüīŃĆüŃé╣ŃāŖŃāāŃāŚŃā¬Ńā│Ńé░Ńü«ŃāŚŃā®Ńé╣ŃāüŃāāŃé»ĶŻĮŃü«Ńé½ŃāÉŃā╝ŃüīŃüéŃéŖŃüŠŃüÖŃü«Ńü¦ŃĆüŃé½ŃāÉŃā╝ŃéƵēŗŃü¦ÕÅ¢ŃéīŃüŠŃüÖŃĆé
µ¼ĪŃü»Ńé╣ŃāŖŃāāŃāŚŃā¬Ńā│Ńé░ŃĆéÕ░ÅÕ×ŗŃāēŃā®ŃéżŃāÉŃā╝Ńü¬ŃéēŃü¬ŃéōŃü©ŃüŗŃüŚŃü”ÕÅ¢ŃéīŃüŠŃüÖŃĆéŃé╣ŃāŖŃāāŃāŚŃā¬Ńā│Ńé░Ńü«ķŻøŃü│ĶĘ│ŃüŁŃü½µ│©µäÅ’╝ü
ńČÜŃüäŃü”ŃĆüķćæÕ▒×ĶŻĮŃü«ŃāĆŃé╣ŃāłŃé½ŃāÉŃā╝ŃéäŃĆüŃāŚŃā®Ńü«ŃāĆŃé╣ŃāłŃé½ŃāÉŃā╝Ńü«Ńé░Ńā¬ŃāāŃāŚŃéÆÕ«łŃéŗŃāŚŃā®Ńé╣ŃāüŃāāŃé»Ķ╝¬ŃéƵēŗŃü¦ÕÅ¢ŃéŖŃüŠŃüÖŃĆé
µ¼ĪŃü»ŃāŚŃā®Ńé╣ŃāüŃāāŃé»Ńü«ŃāĆŃé╣ŃāłŃé½ŃāÉŃā╝ŃéÆŃüŁŃüśŃüŻŃü”ÕÅ¢ŃéŖŃüŠŃüÖŃĆéÕŖøŃü«ŃüéŃéŗõ║║Ńü»µēŗŃü¦Ńü¦ŃüŹŃéŗŃéēŃüŚŃüäŃü¦ŃüÖŃüīŃĆüń¦üŃü»ŃāēŃā®ŃéżŃāÉŃā╝ŃéÆõĮ┐ŃüŻŃü”ńĘ®ŃéüŃüŠŃüŚŃü¤’╝łń¦üŃü»ÕåÖń£¤ŃéÆŃü©ŃéŖŃüŠŃüøŃéōŃü¦ŃüŚŃü¤ŃüīŃĆüŃüōŃéōŃü¬µä¤Ńüś’╝Ühttp://www.hubstripping.com/shimano-alfine/alfine-strip/slides/alfine8.html’╝ēŃĆé
ŃüØŃüåŃüÖŃéŗŃü©ŃĆüŃāÅŃā¢Ńü«ÕåģÕü┤Ńü«Ńé«ŃéóŃā”ŃāŗŃāāŃāłŃüīŃüŹŃéīŃüäŃü½ÕÅ¢ŃéīŃüŠŃüÖ’╝łhttp://www.hubstripping.com/shimano-alfine/alfine-strip/slides/alfine9.html)ŃĆé
ń¦üŃü«Ńé«ŃéóŃā”ŃāŗŃāāŃāłŃü»õ╗źõĖŗŃü¦ŃüÖŃĆéŃéäŃü»ŃéŖµ░┤Ńü«õŠĄÕ«│ŃüīĶ”ŗŃéēŃéīŃüŠŃüÖŃĆé
ĶīČĶē▓Ńü«ŃééŃü«Ńü»ŃéĄŃāōŃü«ÕģźŃüŻŃü¤Ńé░Ńā¬Ńā╝Ńé╣Ńü¦ŃüÖŃĆéÕĖāÕĘŠŃü¦ń░ĪÕŹśŃü½ÕÅ¢ŃéŖķÖżŃüæŃüŠŃüŚŃü¤ŃĆéŃüōŃüōŃü¦ŃĆüŃé«ŃéóŃā”ŃāŗŃāāŃāłŃéÆĶ╗ĖŃā”ŃāŗŃāāŃāłŃü©Ńā¬Ńā│Ńé░Ńé«ŃéóŃā╝Ńā”ŃāŗŃāāŃāłŃü½Ńü░ŃéēŃüŚŃĆüÕåģÕü┤Ńü«ńé╣µż£Ńü©ĶĪīŃüäŃüŠŃüÖŃĆéŃāŁŃā╝Ńé┐Ńā╝Õü┤Ńü«Ńé╣ŃāŖŃāāŃāŚŃā¬Ńā│Ńé░ŃéÆÕÅ¢ŃéŗŃü©õĖĪÕü┤ÕłåĶ¦ŻŃüĢŃéīŃüŠŃüÖ’╝łhttp://www.hubstripping.com/shimano-alfine/alfine-strip/slides/alfine12.html’╝ēŃĆé
ŃüōŃü«ŃéłŃüåŃü½Ńü¬ŃéŖŃüŠŃüÖ’╝Ühttp://www.hubstripping.com/shimano-alfine/alfine-strip/slides/alfine13.html
ń¦üŃü«ÕĀ┤ÕÉłŃĆüÕ╣ĖŃüäŃü¬ŃüōŃü©Ńü½ńĢ░ÕĖĖŃüīŃüéŃéŖŃüŠŃüøŃéōŃü¦ŃüŚŃü¤Ńü«Ńü¦ŃĆüŃé│Ńé░Õü┤Ńü«ŃāÖŃéóŃā¬Ńā│Ńé░ŃéÆÕÅ¢ŃüŻŃü”µĖģµÄāŃüŚŃé░Ńā¬Ńā╝Ńé╣ÕĪŚŃüŻŃü¤ÕŠīŃĆüõĖĪÕü┤ŃéÆÕģāŃü½µł╗ŃüŚŃüŠŃüŚŃü¤ŃĆéÕģāŃü½µł╗ŃéŗŃü©ŃüŹŃü½ŃĆüĶ╗ĖŃü½ŃüéŃéŗÕć╣Ńü©Ńā¬Ńā│Ńé░Ńé«ŃéóŃā”ŃāŗŃāāŃāłŃü«ÕćĖŃéÆŃüéŃéÅŃüøŃü”ŃĆüŃé«ŃéóŃéÆŃüäŃüśŃéŖŃü¬ŃüīŃéēŃé╗ŃāāŃāłŃüŚŃüŠŃüÖ’╝łŃé«ŃéóŃüīŃüÖŃüÉŃü½ÕÉłŃéÅŃü¬ŃüäŃüōŃü©ŃééŃüéŃéŖŃüŠŃüÖ’╝ēŃĆé
Ńé╣ŃāŖŃāāŃāŚŃā¬Ńā│Ńé░ŃéÆÕÅ¢ŃéŖõ╗śŃüæŃü¤ÕŠīŃĆüŃé¬ŃéżŃā½ŃāÉŃé╣Ńü½ÕģźŃéīŃüŠŃüÖŃĆéń¦üŃüīõĮ┐ŃüŻŃü¤ATFŃü»Ķ┐æŃüÅŃü«EneosŃé¼Ńé╣Ńé╣Ńé┐Ńā│ŃāēŃü¦ÕŻ▓ŃüŻŃü”ŃüéŃéŗŃüöŃüŵ֫ķĆÜŃü«ATFŃü¦ŃüÖŃĆé2LŃüéŃéīŃü░ÕŹüÕłåŃü¦ŃüÖŃĆé
Õ«╣ÕÖ©Ńü»2LŃü«ŃüŖĶīČŃāÜŃāāŃāłŃā£ŃāłŃā½Ńü¦ŃüÖ
5ÕłåŃü╗Ńü®µĄĖŃüŗŃüŻŃü¤ÕŠīŃĆü5ÕłåŃü╗Ńü®Ńü»ŃüŗŃüøŃüŠŃüÖŃĆéµ▒ÜŃéīŃü¤Ńé░Ńā¬Ńā╝Ńé╣ŃüīÕ×éŃéīµĄüŃüŚŃüŠŃüŚŃü¤ŃĆé
ŃüØŃü«ÕŠīŃü»ŃāŁŃā╝Ńé┐Ńā╝Õü┤Ńü«ŃāÖŃéóŃā¬Ńā│Ńé░Ńü½Ńé░Ńā¬Ńā╝Ńé╣ŃéÆŃéäŃéŖŃĆüŃé«ŃéóŃā”ŃāŗŃāāŃāłŃéÆŃāÅŃā¢Ńü½µł╗ŃüŚŃĆüõ╗śÕ▒×Ńü«ŃééŃü«’╝łŃāĆŃé╣ŃāłŃé½ŃāÉŃā╝ŃĆüŃé│Ńé░Ńü¬Ńü®’╝ēŃéÆÕÅ¢ŃéŖõ╗śŃüæŃüŚŃüŠŃüŚŃü¤ŃĆé
µ£ĆńĄéńÜäŃü½ŃĆüõ╗źÕēŹŃéłŃéŖŃééµæ®µō”ŃüīŃüĀŃüäŃüČÕ░æŃü¬ŃüÅŃü¬ŃéŖŃüŠŃüŚŃü¤’╝łµ░┤Õ«│õ╗źÕēŹŃéłŃéŖŃéé’╝ēŃĆéķĆÜÕĖĖŃĆüŃāÜŃāĆŃā½ŃéÆķĆåÕø×Ķ╗óŃüÖŃéŗŃü©ÕŠīŃéŹŃü«ŃāøŃéżŃā╝Ńā½ŃüīÕø×Ķ╗óŃüŚŃüŠŃüÖŃüīŃĆüŃé¬ŃéżŃā½ŃāÉŃé╣Ńü«ÕĀ┤ÕÉłŃĆüŃüŠŃüŻŃü¤ŃüÅÕĮ▒ķ¤┐ŃüŚŃüŠŃüøŃéōŃĆéÕż¦õĮō45ÕłåŃü╗Ńü®Ńü«õĮ£µźŁŃü¦ŃüŚŃü¤ŃĆé
September 3rd, 2012 | categorizilation: all categories,equipment,Japan,Post-2008
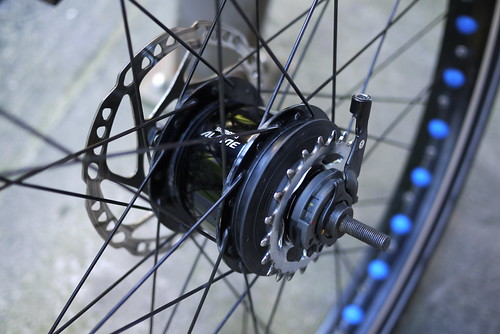
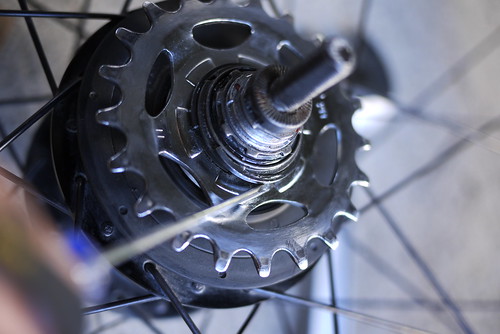
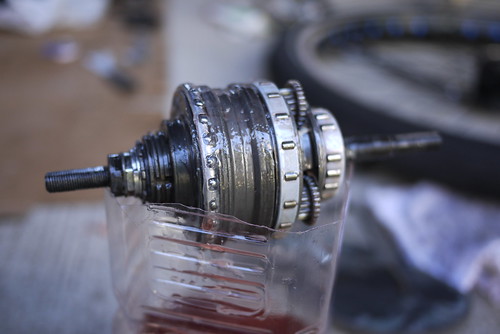
Just over a year ago, I acquired a bicycle – a Surly Karate Monkey (http://14degrees.org/en/?p=1547). Stock standard, the bike is a single-speed. In other words, it has only one gear. This is not conducive to the most efficient cycle touring in the world, so I splashed out and changed to a Shimano Alfine 8-speed internal gear hub (IGH).
As you can see, there one cog on the outside, and all the gears, in the form of, literally, gears, are on the inside of the hub shell. The beauty of this setup is that a bicycle with an IGH essentially becomes maintenance free (when one compares with a typical derailleur setup, where you have to clean multiple oily cogs quite often).
IGH’s do need maintenance every now and then, though. I’ve heard of some going for three years before being opened up, and the insides looking like new, but after one year, mine was starting to act up a little; a little more friction than usual, and it was sometimes taking a full half-rotation of the pedals in order for the drive to engage after free-wheeling. I live in Sapporo, Japan, and even though this is the land of Shimano, IGH-equipped bikes are extremely rare here, so there was little to no chance of having the hub serviced locally. Therefore,┬ĀI decided it was time to pull the thing to bits and have a gander.
The most useful resource for learning about how to pull a Shimano Alfine 8-speed hub to bits was this video below.
Other resources included Nick Foster’s very recent post, of course Muddymole’s post, Ian’s page about the Nexus hub and adding an oil port (similar to the Alfine, but with less sealing), Lachlan Hurst’s post, wisdom from Ecovelo, bike mechanic Sam Larson, Thad at the Golden Wrench and his experiences, Aaron’s Bicycle Repair’s great resource, Sheldon Brown’s advice on lubrication for IGH’s, and last but not least, Hubstripping.com’s page on the Alfine 8-speed hub.
In any case, armed with the right knowledge, and some new tools (I needed a 15mm cone spanner and a centerlock sprocket sans-pin) I got to work.
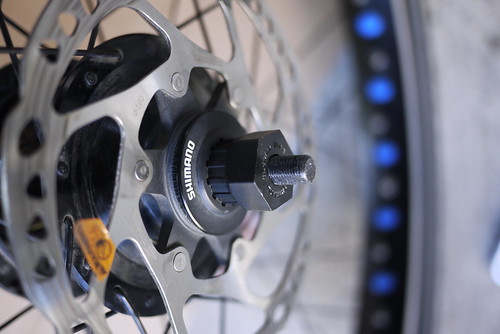
First off is the Shimano Centerlock disk brake rotor. For this, you need a centerlock/cassette tool without the quick-release pin┬Ā(so it will go over the solid axle of the Alfine hub). The item number on my Shimano tool was TL-FW30.
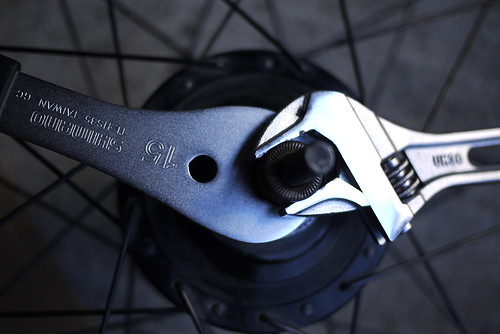
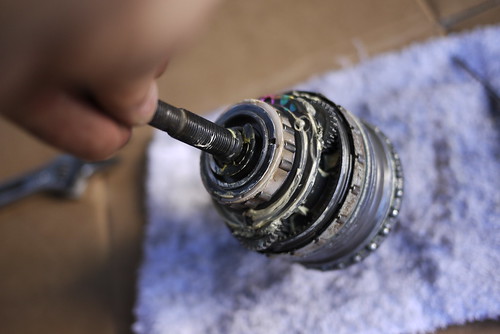
Once that was off, I was able to access the locknut and cone. Using a 15mm cone spanner and adjustable spanner, I removed the cone.
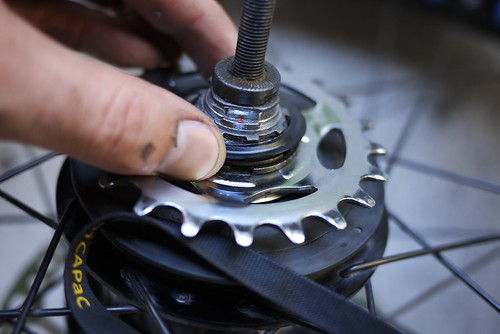
With these removed, the wheel is flipped over and the drive side bits and bobs removed. This includes the shifting accessories which allow access to a small snap-on plastic cover, which is concealing the snap-ring that holds the cog on. This plastic cover can be pried off by hand very easily.
Next is the snap-ring. A small flat-head screw driver does this job well. Keep your free hand over the snap-ring – when it finally comes loose, it will spring off forcefully.
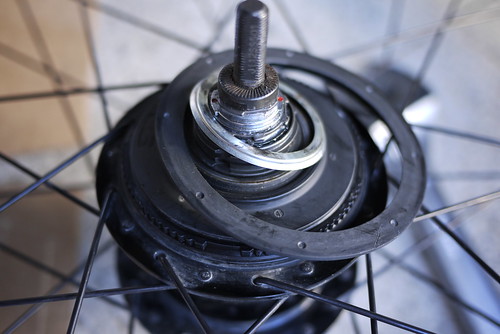
Once you have the snap-ring and cog off, a metal dustguard and plastic ring needs to be removed. The plastic ring provides access to the knobby ‘grip’ of the main screw-on dust-cap, which holds the guts of the hub in.
Some people have reported being able to screw open the dustcap by hand (it screws open clockwise, which is opposite to normal), but I had to take to it with a screwdriver to loosen it a little. Once the dustcap comes free, the whole hub shell will fall away from the insides.
On my hub, I noticed right away that water had entered the hub at some stage. I do vaguely remember the non-drive side cone being loose at one stage, and suspect that this was the┬Āculprit. If the cone is on properly, then the rubber seal should prevent any water from getting in. The rusty residue was not too bad though, and wiped off easily. After cleaning the hub shell, however, there were some visible blemishes on the bearing race, but no noticeable pitting.
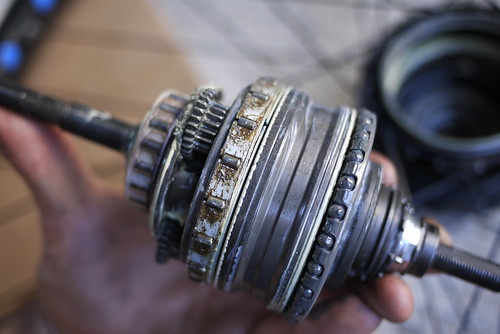
To remove the drive-side bearing cage, the hub needs to be split into two pieces. This is achieved by removing the snap-ring at the non-drive side of the unit.
The whole axle unit slides out of the main ring gear unit in two bits (explosion drawing here). There was no visible rust residue inside, so that was reassuring. I cleaned up the drive-side bearing cage, re-greased it, and put the two pieces back together. This is done by lining up the tab on the ring gear unit, and the groove in the axle unit. Even when the tab and groove are lined up, however, the gears need to be rotated around a little to get the ring gear unit to mate to the axle unit (this can take a while to get right).
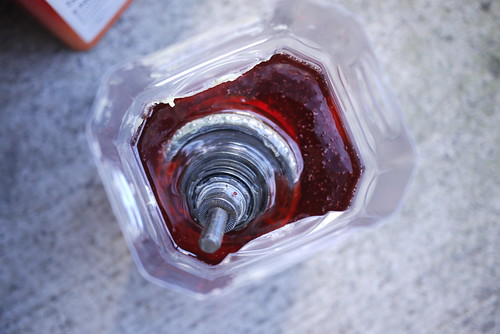
Everything back together, with snap-ring re-installed, the whole lot gets dunked in auto transmission fluid. Mine was just normal, service station (gas station) ATF, using a 2 litre PET bottle as a dunking container.
I left it in for about 5 minutes, and then let it drain for about 10 minutes while I was re-greasing the insides of the hub casing.
The innards then went back into the hub shell, the various dust covers put back on, the cog and snap-ring (which can be infuriating to get on) and the gear-shifting accessories. And then I took it all to bits again. No joke. I had put the drive-side bearing cage on the wrong way around. The picture above shows it in the correct orientation. That was not a happy moment when I had realised I had put it on wrong…
In all, it took me about 45 minutes plus another 20 minutes to rectify the bearing cage issue. Next time it will take around 30 minutes, I would say. That’ll probably be in another 12-18 months time.
Without the oil bath, the hub just has grease inside it. This means there is quite a lot of friction. For example, when back-pedaling┬Āthe bike ┬Āon a workstand, the back wheel will start to rotate backwards. With the oil bath, however, backpedaling does not affect the back wheel. I didn’t notice any difference in gear changing; that is as smooth as ever.
